Classes begin in this course on Thursday, September
5, 2024.
Lab/Recitation Activities
Lab activities may continue the discussion of the most recent topics covered
in the preceding lecture(s) and how they relate to the work you have to
complete for evaluation. Topics external to the zyBook may also be covered
during the lab/recitation sessions. Hands-on exercises will also take place
during lab/recitation sessions, and may require individual effort, or may
involve small groups in a breakout room setting.
In preparation for any work you will be doing on the
web.cs.smu.ca Linux server, such as practice exercises or lab
development for your weekly submissions, once the course enrollment has
stabilized you will receive a personal course account for use on our virtual
Linux server. As soon as you get that account you should log in and try out
a few Linux commands on the new account. Your username will have the form
uxx, and its initial password will be your A-number. To log in with ssh,
first open a command window (on Windows) or a terminal window (on a Mac) and
then enter a command like this:
ssh uxx@web.cs.smu.ca
As soon as you log in for the first time, change your password to one that
is easy to remember by using the passwd command.
You will continue to use this account throughout the course, but usually by
connecting to your account via the Visual Studio Code editor rather than by
using the ssh command.
Lab exercise for the week of Monday, November 25, 2024 (based on a third
version of the Restaurant Reviews example from zyBook Section 5.8)
First, because this exercise involves several web pages we do not have any
accompanying images, here in the description, but you can see what the end
result should be here:
http://web.cs.smu.ca/~u48/sandbox/restaurants3/restaurants3.html
-
The simplest way to start this exercise is to make a complete copy of your
restaurants2 folder from last week and call it restaurants3, since the
basic structure will be the same. The bottom line here is that we assume
you are starting from a successful completion of last week's exercise, and
we just describe what is to be added or changed for this week.
-
The first change is to rename restaurants2.html to restaurants3.html and
make the necessary title and any other changes in that file (the last line
of the display with the "updated information" should be analogous to that
line in version 2 from last week).
-
Second, copy the about.html file from the zyBook to your restaurants3
folder.
-
Next, add a new folder to your restaurants3 folder called reviews and copy
the two review files mainstreetcafe.html and greekhouse.html from the
zyBook to that folder.
-
Now make sure that all links to and from the new files work properly.
-
Change the footer copyright year to 2024 on all pages and also make sure
the second footer "updated by" line (with date) appears on all pages.
-
Copy the necessary styles from the zyBook and make any necessary changes
to the HTML page markup so that all pages have the same red header, the
same menu bar, and the same light blue background. Be careful when you are
copying styles not to overwrite your own previous styles for the animated
popup.
-
When your site displays correctly, behaves correctly, and validates,
announce that you are ready for testing in the usual way.
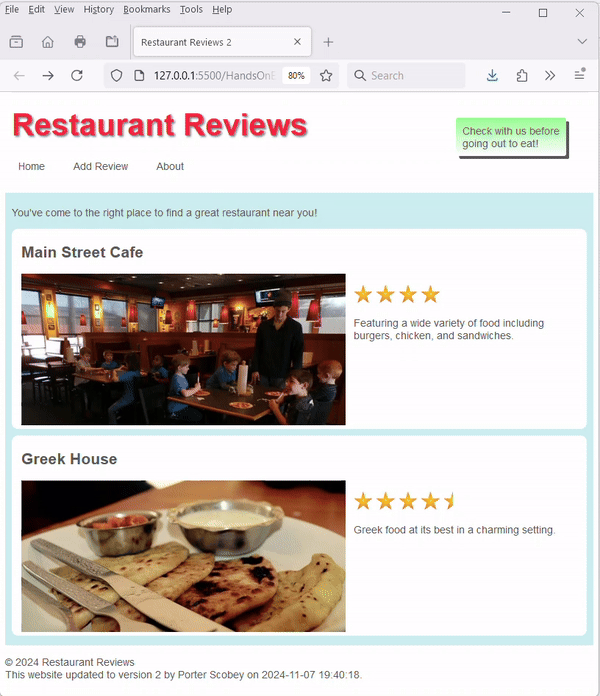
Lab exercise for the week of Monday, November 18, 2024 (based on the
second version of the Restaurant Reviews example from zyBook Section 5.8)
-
First, review the second version of the Restaurant Reviews website in
the zyBook to see how it behaves, and note especially how the
advertisement box "floats down" from the top, and also how it reacts when
the mouse hovers over it.
-
Your task this week is to produce a home page that looks and behaves like
the page shown in the following animated gif:
-
So ... in the sandbox directory of your u## account on the server create a
subdirectory called
restaurants2.
-
In the
restaurants2 subdirectory create another
subdirectory called css.
-
Copy the second
styles.css file from zyBook Section 5.8 to
your new css subdirectory on the server.
-
In the
restaurants2 subdirectory create another
subdirectory called images.
-
Into the
images subdirectory put copies of all of the same
images you used for version 1 of this website:
mainstreetcafe.jpg, greekhouse.jpg,
star.png, and star_half.png.
-
Copy the second
index.html file from zyBook Section 5.8 to
your restaurants2 subdirectory on the server and rename the
file restaurants2.html.
-
Change the title element content to "Restaurant Reviews 2", adjust the
value of the href attribute of the link element on your
restaurants2.html page so that the page links properly to
your styles file, adjust the href attribute in your Home link so that it
also works properly, and change as well all the image links to link to the
images in your images directory, not to the
images on the zyBooks website.
-
Change the text of the "advertisement box" to the text shown in the above
animation (appearing on two lines without any underline). Also ...
make the box slide in from the right rather than down from the top, and
use 1 second for both the animation delay and the animation
duration.
-
Change the CSS for the :hover pseudo-class on the box containing the
advertisement so that hovering over the ad with the mouse translates it to
the left 100 pixels and down by 50 pixels and also scales it by a factor
of 2. [Both of these transformations must be placed in the value section
of a single transform property, one after the other with just a single
space between them.]
-
Change the year in the first line of the footer to the current year, and
add a second line to the footer containing the following sentence:
This website was updated to version 2 by Yourfirstname Yourlastname on
2024-11-07 19:40:18.
[Note that the date and time should be whenever you do the work, not a
duplicate of the date and time shown here. And note that the easiest way
to get the date and time you want is to use the VS Code keyboard shortcut
Ctrl + Shift + I, but to have this shortcut available you need to install
the Insert Date Time VS Code extension.]
-
The restaurant ratings must be the same as last week: 4 stars for the Main
Street Cafe and four-and-a-half stars for the Greek House.
-
Go to the
restaurants2.html file in your browser and
display the page.
-
When the file displays correctly, behaves correctly, and validates against
HTML5 and CSS3, announce that you are ready for testing in the usual way.
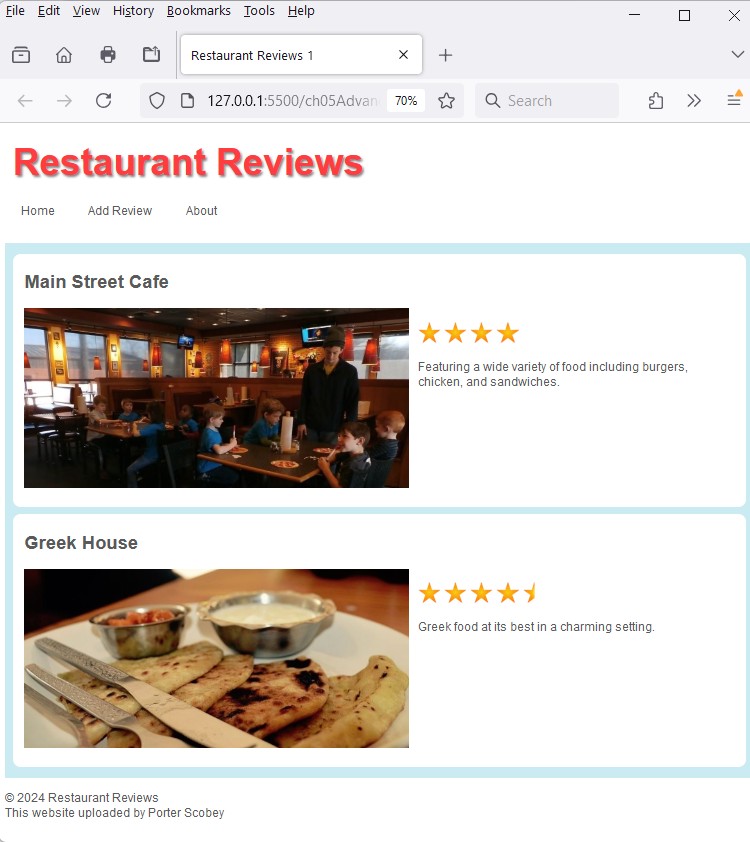
Lab exercise for the week of Monday, November 4, 2024 (based on the first
version of the Restaurant Reviews example from zyBook Section 5.8)
-
In the sandbox directory of your u## account on the server create a
subdirectory called
restaurants1.
-
In the
restaurants1 subdirectory create another
subdirectory called css.
-
Copy the first
styles.css file from zyBook Section 5.8 to
your new css subdirectory on the server.
-
In the
restaurants1 subdirectory create another
subdirectory called images.
-
Into the
images subdirectory put copies of all the images
you will need for this and any subsequent versions of this website:
mainstreetcafe.jpg, greekhouse.jpg,
star.png, and star_half.png.
-
Copy the first
index.html file from zyBook Section 5.8 to
your restaurants1 subdirectory on the server and rename the
file restaurants1.html.
-
Change the title element content to "Restaurant Reviews 1", adjust the
value of the href attribute of the link element on your
restaurants1.html page so that the page links properly to
your styles file, adjust the href attribute in your Home link so that it
works properly, and change as well all the image links to link to the
images in your images directory, not to the
images on the zyBooks website. Finally, reverse the star ratings for the
two restaurants ... give Main Street Cafe four stars and Greek House four
and a half stars.
-
Change the year in the first line of the footer to the current year, and
add a second line to the footer containing this text:
This website uploaded by Yourfirstname Yourlastname
-
Go to your
restaurants1.html in your browser and display the
file, then validate both its HTML and its CSS. Correct any errors or
warnings that either validator discovers. Your page (with your name in the
last line, of course) should look like this.
-
When the file displays correctly and validates, announce that you are
ready for testing in the usual way.
Lab exercise for the week of Monday, October 28, 2024
For this exercise you have again the choice of putting your styles in a
style element in the head of your HTML file, or in a separate file, but if
you use a separate file, call the file FeedbackForm.css to
distinguish it from any other styles files in your sandbox directory.
-
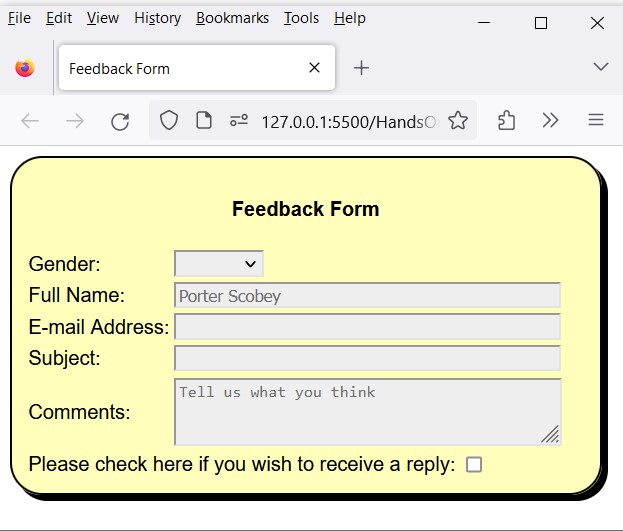
In the
sandbox directory of your u## account
create a file called FeedbackForm.html which looks like this
when first displayed (except that it must be your first
name followed by your last name that appears as the placeholder in the
name textbox):
Note that this is not a "real" form, since there is no submit button,
so the main goal of this exercise is for you to create a simple form that
has some styling applied. Thus, for simplicity, all you need to hold the
form widgets is a 6-row by 2-column table, so you don't need any of the
more "advanced" concepts we've seen, such as flexbox, gridbox or
box-sizing (for example). Also, for simplicity, you can omit the use of
the label element, and simply label your widgets by putting the label text
in the first column of the table.
-
Here are the things you need to know to make your display look (and
behave) like the sample:
-- The body of the page contains a main element of
width 450px, which in turn contains an h4 element with
centered heading content "Feedback Form".
-- The form element comes after this h4
element.
-- The main element also has a background color of
#FFB, uses 10px of padding and an Arial font of the default
size, and also has a 2px solid black border with a border radius at all
four corners of 25px, as well as a 5px black box shadow at the bottom and
right edges.
-- As for form widgets, the form contains one select
element for the dropdown, two input elements of type
text and one of type email (all three having
size 40), a textarea element with two rows and
40 columns with the placeholder value you see in the sample,
and a single checkbox. [Don't worry if your textarea widget
is not exactly the same length as the three input widgets in your
display.]
-- The select, input and
textarea widgets all have a background color of
#EEE.
-- The styles contain no additional spacing, so any spacing you
see aside from the padding mentioned above is default spacing supplied by
the browser.
-
You cannot "see" how the web page "behaves" by looking at the sample
display, so we will demonstrate the behavior at the beginning of the
evaluation session. In the meantime, here is a description of the required
behavior, which is all you need to know to achieve the required behavior:
-- The select, input and
textarea widgets all get an aqua background
color when they receive the focus.
-- The gender dropdown widget is initially empty as seen in the
example, and offers just three options: Male, Female, and Other.
-- The input widget of type email has a
2px red border if it contains an invalid email.
-- The checkbox shows the usual check mark when clicked by the
user.
-
When you have finished, and have also tested the required behavior and
validated your page for HTML5 and CSS3, announce your readiness for
testing in the usual way.
Lab exercise for the week of Monday, October 21, 2024 (based on zyBook
Section 4.7)
This week's hands-on exercise is just a short one to confirm that you can
create a small website on our server. The steps below are similar to some of
the ones you will have to perform for the upcoming Submission 01, except
that this exercise just requires some copying and pasting from the zyBook
into the right files on the server, but (of course) Submission 01 will
require you to create a new website of your own.
-
In the
sandbox directory of your u## account on
the server create a subdirectory called band.
-
In the
band subdirectory create another subdirectory called
css.
-
Copy the first
band.html file from zyBook Section 4.7 to your
new band subdirectory on the server.
-
Copy the first
styles.css file from zyBook Section 4.7 to
your new css subdirectory on the server.
-
Adjust the value of the
href attribute of the
link element on your band.html page so that the
page links properly to the styles file.
-
Put the following line in an
h3 element, with the text
centered, and containing your name, immediately under the
Reach Out header.
(Website under development by
FirstName LastName © 2024)
-
Go to your
band.html in your browser and display the file,
then validate it for both HTML5 and CSS3.
-
When the file displays properly (as seen in the zyBook), contains your
name (as described above) and passes both validations (HTML5 and CSS3),
announce that you are ready for testing in the usual way.
Lab exercise for the week of Tuesday, October 15, 2024 (Bowser.html)
Note that for this exercise placement of CSS is not specified, so
you have the option of putting it in a separate file (always the best
choice) or putting it in a style element in your HTML document (the most
convenient choice). If you opt for a separate file, Bowser.css (and not
Browser.css as it said earlier, that was typo) would be the best name for
the file since that would visually associate the CSS file with the
appropriate HTML file (they're both in the same directory).
-
In the
sandbox directory of your u## account
on our web.cs.smu.ca server create a file called
Bowser.html whose contents must produce a web page that can
be made to look like this by sizing the browser window properly (except,
of course, that it must be your name to contact if Bowser
is found):
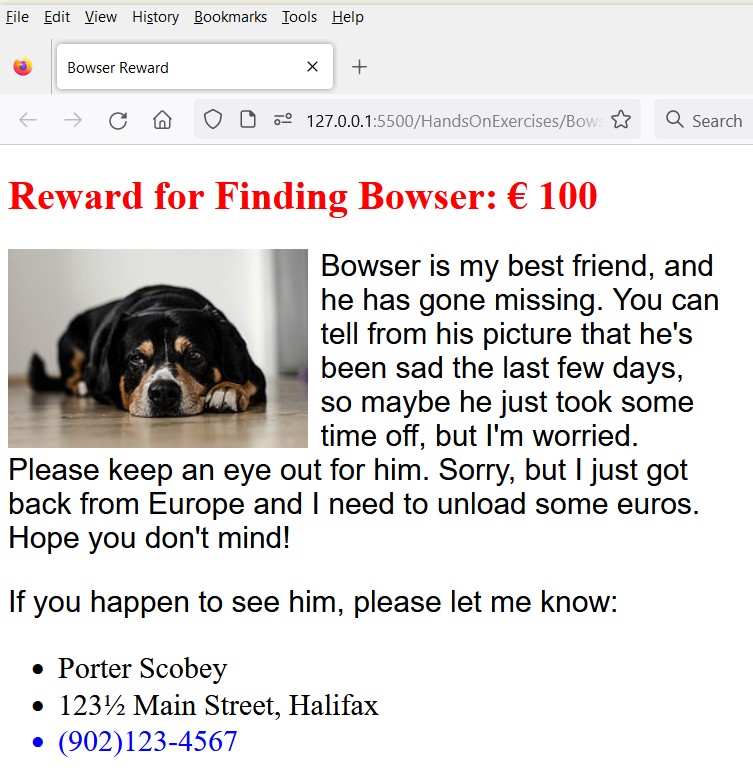
For this page you will clearly have to create some styles, so you need to
know the following facts about the page:
- The body element has a width of 60%.
-
There is one h1 element, two paragraph elements, and a list element.
- You need two colors, which are (obviously) red and blue.
- The paragraphs have a 1.5em Arial font.
-
The list items have an x-large font size, but otherwise use the
default font properties.
-
You need two HTML5 entities--one for the euro symbol, and one for the
1/2 symbol--each of which you should be able to find with a quick
Google search.
-
The image of Bowser is, of course, "floated", and also has 10 pixels
of padding on its right hand side. You can get a copy of the image of
"Bowser" from the zyBook (immediately below Participation Activity
4.4.5) and put that copy in your sandbox, or (which is easier) just
link to the image in the zyBook directly from your own web page.
-
Important Note: Even if you have everything correct, your
browser display will probably not look exactly like the sample when you
first display it, but if you have all the styles and text correct you can
make it look like the sample by adjusting the size of your browser window.
-
Use the same address and phone number seen in the list (but your
name, of course). And here, for your copying convenience, is
the text of the two paragraphs you need:
Bowser is my best friend, and he has gone missing. You can tell from his
picture that he's been sad the last few days, so maybe he just took some
time off, but I'm worried. Please keep an eye out for him. Sorry, but I
just got back from Europe and I need to unload some euros. Hope you don't
mind!
If you happen to see him, please let me know:
-
When you have finished, tested and validated your page for both
HTML5 and CSS3, and checked that the correct text with the
correct capitalization appears in the browser tab when your page displays,
announce your readiness for testing in the usual way.
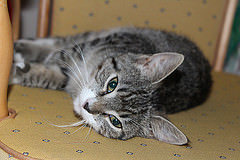
Lab exercise for the week of Monday, October 7, 2024
(IllustratingStyles.html and IllustratingStyles.css)
-
In the
sandbox directory of your u## account
on our web.cs.smu.ca server create two files: one called
IllustratingStyles.html containing HTML markup and one called
IllustratingStyles.css containing the CSS that will style the HTML.When
displayed, the page must be laid out like this, except that the last line
must contain your name (and note as well that you will likely have to
resize your browser window to make it look exactly like this):
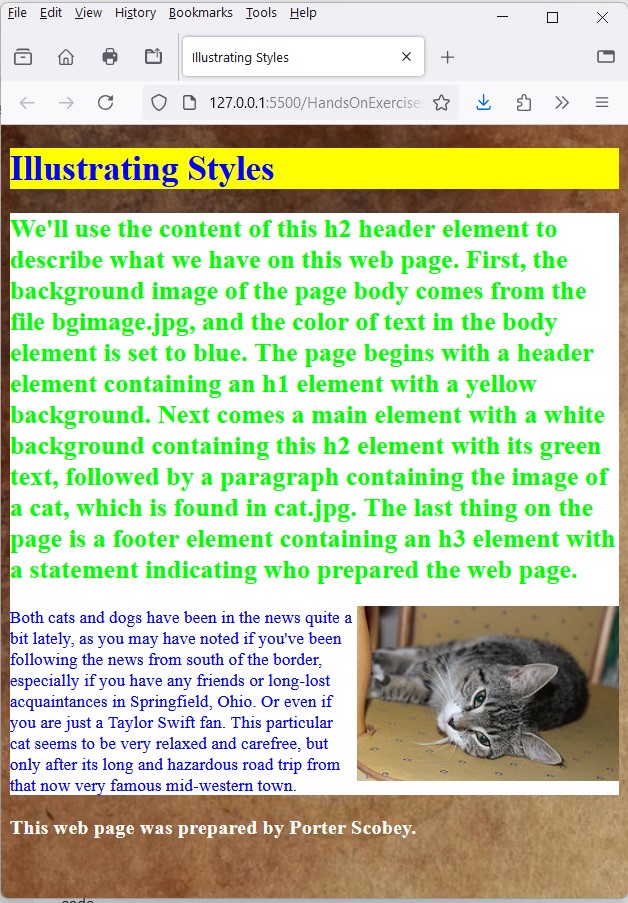
Reading the green text in the page display tells you what the various
parts of the page are and how they are styled. [Although the green text
does not point this out, note that the last line on the page must have
white text.] The two files that you need for the background image in the
body, and for the cat, are here: bgimage.jpg and cat.jpg. You may choose how your page
accesses the images: you can put copies of the images in your sandbox
directory so that they are in the same location as your page files, or you
can link to the images using the urls from right here on this page.
-
To save you some time and "busy work" and since you cannot easily copy the
paragraph text from the image, here is the text for the two paragraphs
that you need for your page, and you can easily copy the following two
paragraphs from here:
We'll use the content of this h2 header element to describe what we have
on this web page. First, the background image of the page body comes from
the file bgimage.jpg, and the color of text in the body element is set to
blue. The page begins with a header element containing an h1 element with
a yellow background. Next comes a main element with a white background
containing this h2 element with its green text, followed by a paragraph
containing the image of a cat, which is found in cat.jpg. The last thing
on the page is a footer element containing an h3 element with a statement
indicating who prepared the web page.
Both cats and dogs
have been in the news quite a bit lately, as you may have noted if you've
been following the news from south of the border, especially if you have
any friends or long-lost acquaintances in Springfield, Ohio. Or even if
you are just a Taylor Swift fan. This particular cat seems to be very
relaxed and carefree, but only after its long and hazardous road trip from
that now very famous mid-western town.
-
When you you have finished, and also tested and validated your file for
both HTML5 and CSS3, announce your readiness for testing by entering your
u?? ready in the Zoom Chat Window (for the first
submission, and u?? again for any subsequent submissions
you might have to make).
Lab exercise for the week of Monday, September 30, 2024 (Deposits.html)
-
In the
sandbox directory of your u## account
on our web.cs.smu.ca server create a file called
Deposits.html whose contents must parallel this web page:
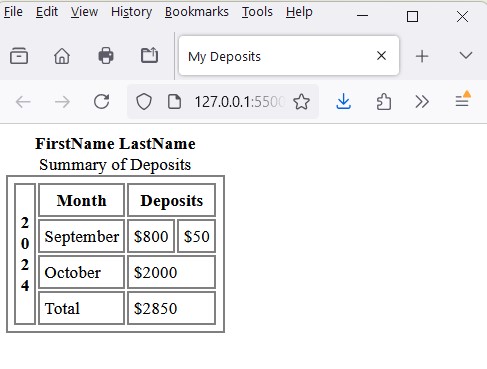
All the text above the table, including your first
and last name, must be placed within a single caption
element. The table itself must look the same as the one above, and contain
the same information. To achieve the table and cell borders and the
spacing around the text you may place the following CSS style
element in the appropriate location within your page markup.
<style>
  table, th, td {
      border: 2px solid gray;
      padding: 4px;
  }
</style>
-
When you you have finished, and also tested and validated your file for
HTML5, announce your readiness for testing by entering your u??
ready in the Zoom Chat Window (for the first submission, and
u?? again for any subsequent submissions you might have
to make).
Lab exercise for the week of Monday, September 23, 2024 (Favorites.html)
-
In the
sandbox directory of your u## account
on our web.cs.smu.ca server create a file called
Favorites.html whose contents must parallel this web
page:
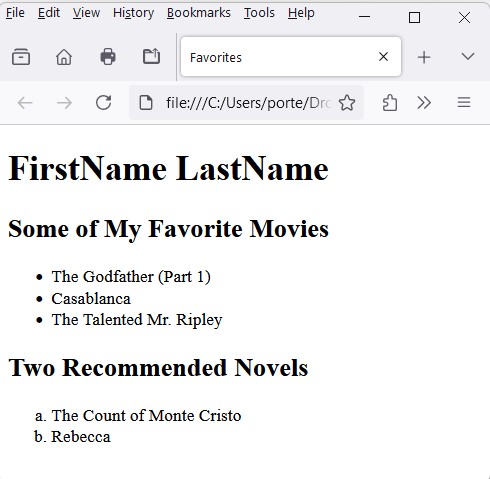
Your name (first name followed by last name) must be in an
h1 element, and this must be followed by an h2
element containing the text shown, and then three of your favorite movies
in an unordered list. Next there must be another h2 element
containing the text shown, and then two novels that you recommend in an
ordered list of the type show. In addition, the title of your page must be
Favorites (with a capital F, and note the
American spelling as opposed to the British/Canadian spelling),
and your page must validate as HTML5. Also, even
if you like the same movies and books as in the example, use other
titles.
-
When you think you have finished your file, look at it in your own browser
to confirm that it is viewable on the web and validates as HTML5, and when
you are ready for testing, enter
uxx ready in the
Zoom Chat window. If you need to submit for testing more
than once, enter uxx again in the Chat window for the second
and all subsequent submissions.
Lab exercise for the week of Monday, September 16, 2024 (my_info.txt)
- In the
sandbox directory of your u## account
on our web.cs.smu.ca server create a file called
my_info.txt whose contents look like the following, except
that the information will be your information:
*********************************
* Name: John Brown              *
* Home: London, England         *
* Current Location: Halifax, NS *
* First year at SMU: 2022       *
*********************************
Position the above "block" of information at the top left corner of the
file. [Note that "Home" and "Current Location" could, of course, contain
the same information.]
-
When you think you have finished your file, confirm that it is viewable on
the web by browsing to your website (
web.cs.smu.ca/~uxx),
then clicking on your sandbox subdirectory, and finally on
your my_info.txt file. You can, of course, do this at
any time after you get your server account, but you must be present in a
Recitation/Lab session to report your submission and have it
evaluated.
-
When your file is completed and viewable on the Internet, announce that
you are ready for testing by placing in the Zoom Chat
window the phrase
uxx ready, where (of course)
uxx is your account username.
-
There are many ways to accomplish this, but the idea is that everyone
should use our recommended Visual Studio Code editor to
connect to the server and also to create this file on the server.